Introduction
A table saw is already one of the most versatile tools in a woodworking shop—but when you add jigs, it becomes a precision machine capable of complex, repeatable, and safer cuts.
Whether you’re a hobbyist or a professional, learning to build and use table saw jigs will:
- Improve accuracy for tricky cuts
- Increase safety by keeping your hands away from the blade
- Save time on repetitive tasks
- Expand your table saw’s capabilities without expensive add-ons
In this guide, you’ll learn:
- What table saw jigs are and why they’re important
- Seven essential jigs every woodworker should have
- Step-by-step building instructions
- How to use each jig effectively
- Pro tips for safety and precision
What is a Table Saw Jig?
A jig is a custom-made accessory that guides your workpiece through the saw in a controlled way.
While the rip fence and miter gauge handle most basic cuts, a jig allows for:
- Complex angles
- Repetitive precision cuts
- Holding awkwardly shaped materials
- Reducing risk by keeping your hands further from the blade
7 Essential Table Saw Jigs
We’ll cover:
- Crosscut Sled
- Tapering Jig
- Box Joint Jig
- Tenoning Jig
- Spline Jig
- Cove Cutting Jig
- Featherboard
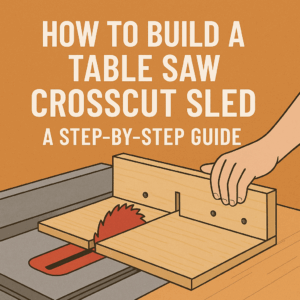
1. Crosscut Sled
Purpose:
- Makes perfectly square crosscuts
- Supports workpiece fully, preventing tear-out
- Safer than using a miter gauge alone
How to Build:
- Base: Use 1/2″ or 3/4″ plywood or MDF.
- Runners: Cut hardwood strips to fit snugly into the miter slots.
- Attach Runners: Glue and screw runners to the base from underneath.
- Fence: Attach a tall rear fence at 90° to the blade.
- Blade Slot: Make the first cut through the sled to create the kerf.
Using It:
- Place workpiece against the fence.
- Slide the sled forward to cut.
- Ideal for repetitive, accurate crosscuts.
Pro Tip: Add a stop block to the fence for repeatable lengths.
2. Tapering Jig
Purpose:
- Cuts legs or boards at a consistent taper.
- Essential for furniture legs.
How to Build:
- Base: 1/2″ plywood cut longer than your workpiece.
- Fence: Attach an adjustable fence at an angle to the base.
- Pivot Point: Add a hinge or pivot at one end for adjustable tapers.
- Clamps: Use toggle clamps to secure the workpiece.
Using It:
- Adjust fence to desired taper angle.
- Secure workpiece.
- Run jig along rip fence.
Pro Tip: Label common taper settings for future use.
3. Box Joint Jig
Purpose:
- Creates interlocking box/finger joints for drawers, boxes, and frames.
How to Build:
- Base: Mount to miter gauge or sled.
- Index Pin: Attach a hardwood pin matching the width of your dado blade.
- Alignment: First cut forms reference slot; space pin exactly one finger width from blade.
Using It:
- Cut first slot with board against the pin.
- Move first slot over the pin and cut next.
- Repeat for all fingers.
Pro Tip: Cut mating pieces sequentially to ensure perfect alignment.
4. Tenoning Jig
Purpose:
- Cuts cheeks of tenons accurately for mortise-and-tenon joints.
How to Build:
- Base: Vertical plywood panel rides against rip fence.
- Support: Add vertical backer board for clamping workpiece upright.
- Clamping Mechanism: Use toggle clamps or screw clamps.
Using It:
- Clamp workpiece upright.
- Run jig along fence to cut one cheek, then flip for the other.
Pro Tip: Use a sharp rip blade for cleaner tenon cheeks.
5. Spline Jig
Purpose:
- Adds reinforcing splines to mitered corners for strength and decoration.
How to Build:
- V-Shaped Support: Create a cradle that holds workpiece at 45°.
- Base: Attach cradle to a flat base that rides against the miter gauge.
Using It:
- Place mitered box corner in cradle.
- Cut spline slot across joint.
- Insert spline and glue for reinforcement.
Pro Tip: Decorative hardwood splines add both strength and style.
6. Cove Cutting Jig
Purpose:
- Cuts concave decorative coves across wood grain.
How to Build:
- Base: Long plywood panel.
- Side Guides: Attach guides at equal angles from blade path.
- Adjust Angle: Wider angles produce wider coves.
Using It:
- Feed workpiece diagonally across blade.
- Take shallow passes, raising blade incrementally.
Pro Tip: Always sand coves for a smooth finish.
7. Featherboard
Purpose:
- Holds stock firmly against fence or table for safer, cleaner cuts.
How to Build:
- Material: 3/4″ plywood or hardwood.
- Fingers: Cut angled slots to create flexible “feathers.”
- Mounting: Fit into miter slot or clamp to fence.
Using It:
- Position so fingers apply light pressure toward fence.
- Prevents workpiece from drifting during cut.
Pro Tip: Use two—one before the blade and one after—for longer boards.
Safety Tips When Using Jigs
- Always turn off and unplug the saw before attaching or adjusting jigs.
- Test each jig with scrap wood before using it on a project.
- Keep hands clear of the blade path at all times.
- Store jigs safely to avoid warping or damage.
Why These Jigs Improve Your Woodworking
- Accuracy: Less room for human error.
- Repeatability: Perfectly identical cuts every time.
- Safety: Keeps hands away from dangerous areas.
- Versatility: Enables cuts you can’t safely make with just the fence or miter gauge.
Conclusion
Adding these seven essential jigs to your workshop will dramatically improve your table saw’s capabilities. From making perfect crosscuts to complex joinery and decorative profiles, these jigs let you tackle projects that would otherwise require multiple expensive machines.
Anns is a contributor at TableSawGuide. We are committed to providing well-researched, accurate, and valuable content to our readers.
You May Also Like
About the Author
Related Articles

Leave a Comment
Share your thoughts, ask questions, or contribute to the woodworking community!